Pages

Wednesday, February 28, 2024

My favorite Comunication Tool is: MS Paint... And it now has LAYERS!

A picture speaks a thousand words. Yet, we most often communicate in a maddening string of 140 characters give-or-take.
In an engineering setting, I find myself often grabbing a quick screenshot and marking it up to get a point across. I use the tool (Snipping Tool - courtesy of Microsoft) at hand when I don't need something more finessed than the awkward squiggly lines drawn by a mouse can afford. Beyond that, the next accessible tool is MS Paint. It's quick, dirty, incorrigible, and gets the job done. I just noticed that MS Paint now has Layers. That's it! I'm all set - I no longer have to re-capture the snip if I make a mistake Yayy! 

 Wait, but there's more. If you are willing to pay, the AI co-creator panel might just make your dreams true.

Saturday, December 7, 2019

Wake up! we are already living in the future... waiting for our minds to catch up.

I may be living in an utopia where crime only exists in the news. Ironical, since the news describes the crime that happens around me, a few feet, a few hundred feet away from me. Yet, I wake up everyday, not thinking about the harm that may befall me due to crime, but more likely about annoying machinations of a colleague. What has this got to do, if anything, with the video I embedded above?

One word:'protect ourselves....'

It is interesting because for a lucky few who happen to live in circumstances where we don't have to think about safety, we are living in a world that is only limited by the constant tug-of-war between the technology that hasn't caught up to its potential and the mind that hasn't recognized the technology that has. It also provides an insight into the moral and political perspectives of the narrator in that self-preservation is the upper most concern of all humanity. But a mind dwelling in an Utopian landscape of ubiquitous and intelligent technology, self-preservation has already been surrendered: it is irrelevant in a post-theistic world.

Thursday, October 20, 2016

Keeping Revit Origins Sane in the Real World

For quite a few years, I've been unsuccessfully trying to wrap my head around this particular portion of Revit. All sorts of experts came up with explanations, processes, and best-practices to tackle the issue. All of the explanations seem like the picture below to me:

Blind Men and the Elephant
 Fig 1: Blind men trying to comprehend an elephant. From Wikipedia. Read the Story here.
This is not an allegory for the folks who have written about this topic. It is a metaphor for my (and a lot of my colleagues') difficulty in comprehending the topic based on their writing.

For anyone transitioning from an AutoCAD workflow to a Revit one, it is often a given that one would instinctively take the a laissez faire approach to handling the issue of setting out Origin Points for a project. Revit as an application, is fairly good at downplaying the whole issue. It usually does not matter until one has to link other models into the Main model where all the documentation is being recorded. Even then, someone in the team magically figures out how to use Shared Coordinates and make the linking work. Then someone accidentally removes a link, or overwrites a Shared Coordinate and then this whole setup suddenly fails to make sense anymore. It is often worse when, later in the project, one has to aggregate all the models in simulation platforms such as Navisworks or Synchro due to the simple reason that other programs are usually unable to read Revit's Shared Coordinates or the teams do not export projects consistently. One can certainly ensure that the project is exported using Shared Coordinates. In practice however, I've found that there are always one or two models that somehow slip between the cracks. So, the work-around seems to be one where one imports all the models, then painfully find objects that belong to the same coordinates and then align everything. Life would be a lot easier, if someone had set the ground rules from early on in the project.

Thursday, September 29, 2016

Revit: Creating Slab Edges With Voids

Slab edges with a depression to accommodate a Window wall seems to be somewhat pesky at this point. That is because the Slab-edge family within Revit is additive. So, if your slab edge is smaller than the depth of the slab, then you have to pull the slab boundary towards the interior of the building and then add the slab-edge family as an extension to the slab. In short, this workflow is less than ideal both in terms of performing the actual work and in terms of managing the model in the long run.

Monday, July 25, 2016

Project 3D Lines Onto Topography

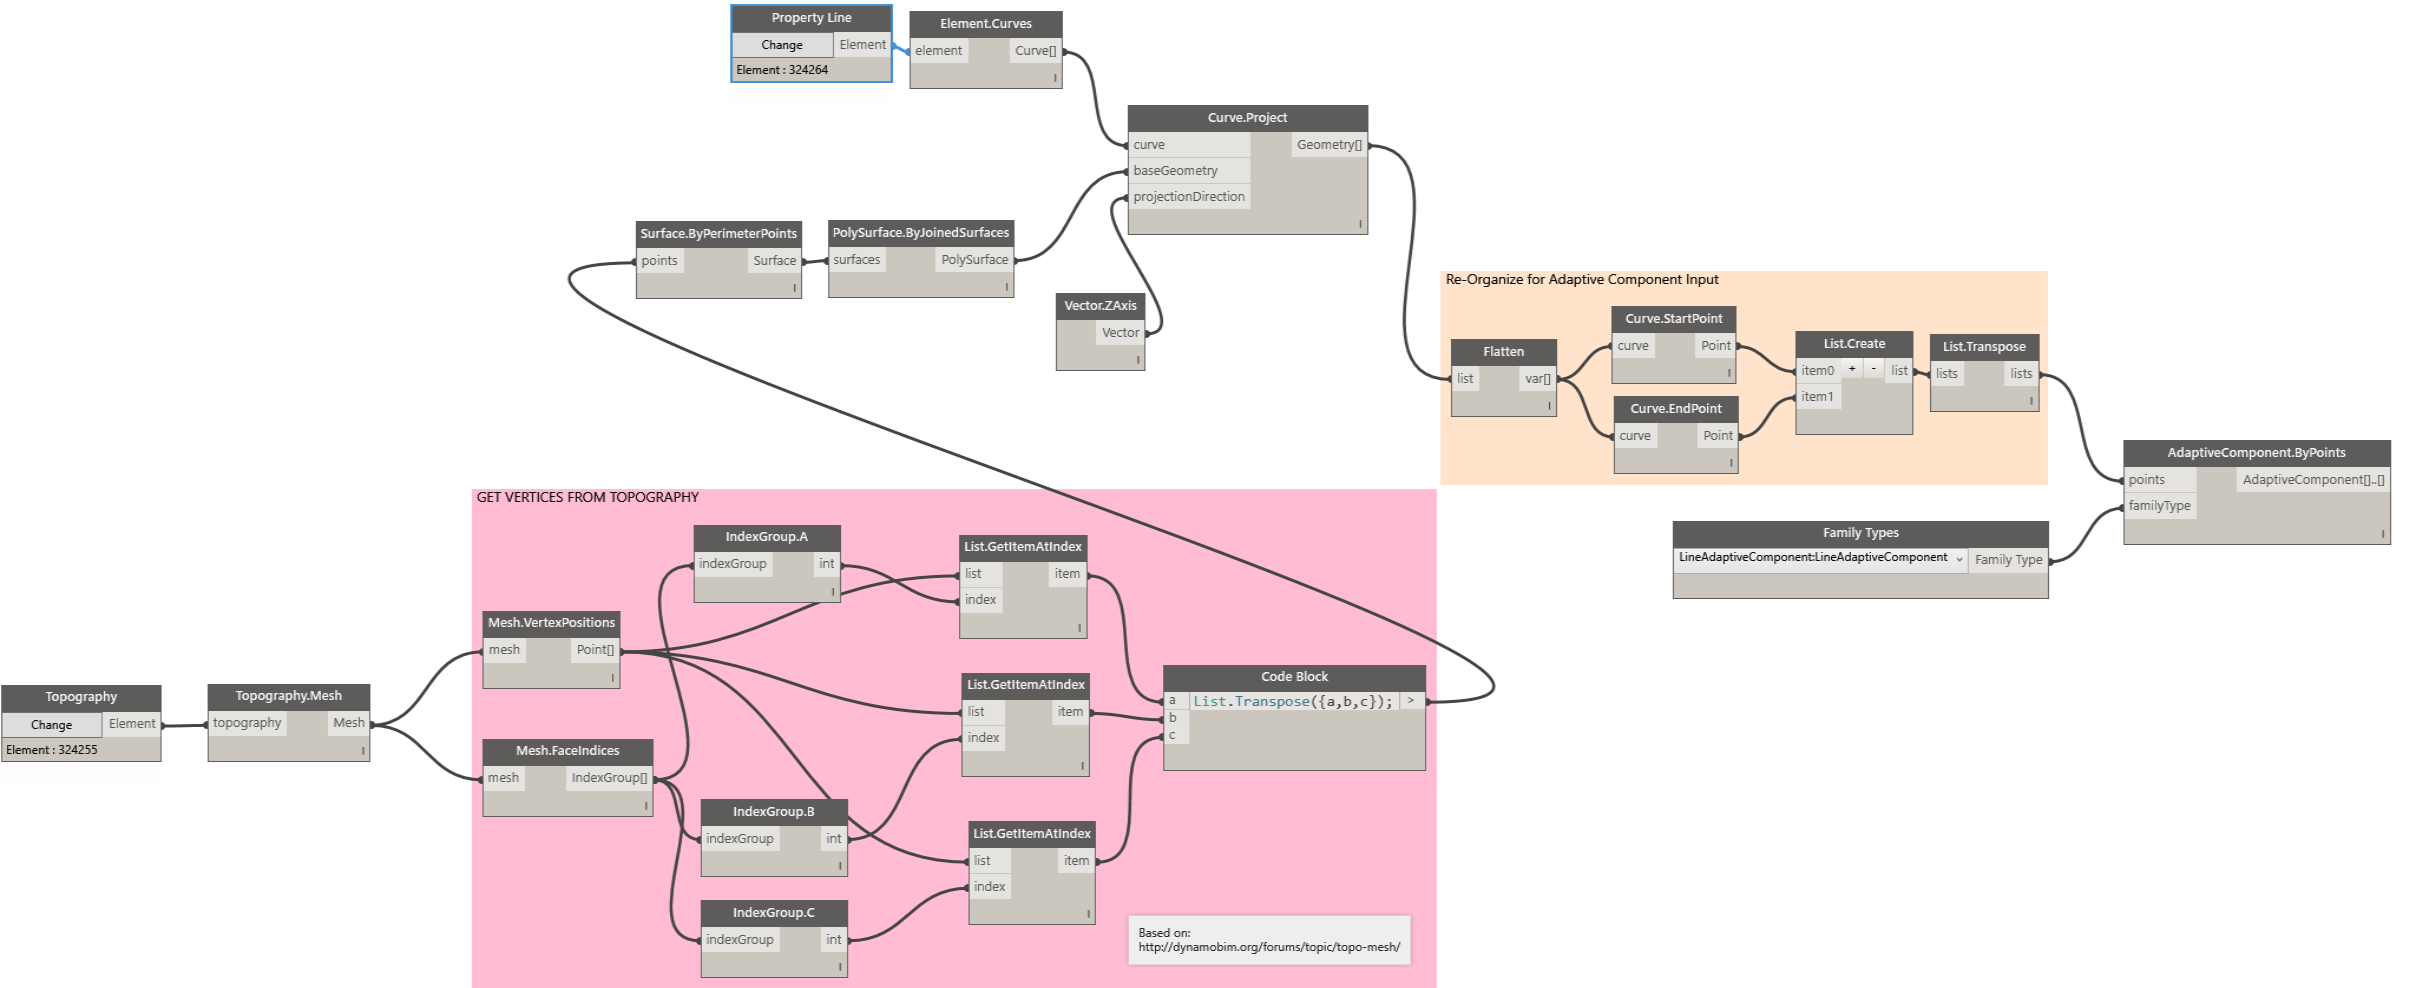
Projecting Lines onto Surfaces within Revit has been tricky for various reasons. One could argue that projecting lines and modeling with primitives are precisely the kind of things Revit was designed to avoid; and I agree with this attitude. But, there are times when you simply want something done a particular way. Fortunately Dynamo can let you be that impish individual that you want to be within the Revit world.

Dyanamo and Adaptive Lines

This recipe documents the process of using Dynamo to project Property Line elements on to the Toposurface within the Revit Project. The actual line work is somewhat tricky. One cannot use Revit's Model Lines for this purpose because each Model Line needs to be associated with a Sketch Plane. With a Complex Toposurface, this approach can be extremely convoluted. A simpler approach is to use a linear element that is not tied to a Sketch Plane. The only class of elements within Revit that allows non-associative placement is the Adaptive Component Family. Accordingly, the projection lines are traced at the start point and end points using a single Adaptive Component consisting of two _Adaptive Points and a Model Line stretching between them. The complete graph and family can be found here:

The Uncomplicated Approach

One can of course eschew the complicated approach of using Dynamo and simply use the Sub Region within the Massing and Site toolset. The results are acceptable except for the fact that one cannot change the Line Style or host any other family along the line. The image below shows the results of using the Sub Region.


Thursday, July 21, 2016

Place & Update Generic Annotation Tags in Revit using Dynamo

As of Revit 2017, the task of displaying Area Tags in Floor Plans outside of Area Plans (such as Rentable Areas) is a manual one. An example of such an application would be an Apartment Building where the total floor area of every Apartment needs to be displayed in addition to room names and dimensions.

Unfortunately, one cannot place an Area Tag in a view other than an Area Plan. Although one can place a Room Tag in an Area Plan, a workflow where the primary plan views are based on Area Plans becomes quite restrictive as the Area Plan View Type does not allow some annotation types such as the call out head to be displayed. Additionally, the Area Boundary Lines themselves can be very annoying.

Many firms resort to a work-around where one places a Generic Annotation Tag in the Floor Plan views and manually updates the Apartment Number and Area. It feels like one is going backwards after adopting a powerful platform like Revit. This chapter is about automating the process of both placing Generic Annotation Tags and updating the same using Dynamo.

The first video of this post shows the placement of Generic Annotation Tags. The second video below, shows the process of updating the tags based on Area properties.

I've documented the rest of this process in the Gitbook and the source files are available on Github. Enjoy!


Tuesday, July 19, 2016

From Revit to Excel and Back

Excel and similar spreadsheet programs have always been the mainstay of data entry and analysis operations. Even with acess to more sophisticated applications, most architects and engineers, still prefer to modify parameters of projects and components with a fluid interface such as a spreadsheet so that they can take the data elsewhere and do interesting things with it.
The Revit Project being a database, always lent itself to extension using Excel. Dynamo made it even more accessible. This recipe is a small demonstration of all the pieces needed to not only extract Revit component parameters to Excel, but also push back updated data back to Revit after performing operations within Excel.
Surprisingly, the biggest challenge turned out to be not the actual connection to Excel, but the smaller nuances of how the parameter data gets modified during the process of transferring between the two applications. If you would like to skip the explanations, you can download the dataset here.

Check out the complete recipe at the work-in-progress GitBook (which, by the way is an awesome platform)

Tuesday, April 5, 2016

The Revit Project As a Tweeter(sic) Using Dynamo (In Four Steps)

Dynamo is to Architects & Designers what Scratch is to toddler geniuses learning to code. It gets us thinking in terms of manipulating the machine in terms of instruction sets rather than punching individual commands at the computer all day. More importantly, it is a platform that is designed to span between the world of coding and the world of assembling architecture. This, by definition, makes this extensible in both directions, seemingly without limits.

The Case for a Project Twitter

Personally, I'm not a tweeter (sic), but after a recent natural disaster, it was the only place to gather information about loved ones in a particular neighborhood. A typical architectural project is not a place where random strangers gather for a round of Kumbaya. However, a platform such as Twitter certainly breaks barriers when broadcasting to a team or a group. It could be anything from a gentle reminder, a recently discovered piece of vital information, or, live tweeting meeting notes. With Dynamo's Iron Python Interface and the ability to add  .dll libraries, along with Twitter's well documented Application Programming Interface (API), the rationale for building a connection between Twitter and the Revit Project quickly went from 'Is there a need?' to 'Why not?'.

The Process

As of the writing of the post, Dynamo does not have a package to retrieve Twitter timelines. PYTHON on the other hand had plenty of easy-to-use libraries to run circles around the twitter library. 'It would be a One-day fun project' I thought. It was... Until I discovered that the beloved 'Tweepy' library for Python does not work for Iron Python that Dynamo allows. I spent three days scouring google and attempting all sorts 'pip' installs - but to no avail. Finally, I gave up and went to my go to code kitchen: Visual Studio using C#. I had recently discovered that Dynamo had a Zero-Touch Plug-in environment that lets one import *.dll libraries and leverage their functionality. After finding a sufficiently simple library (Tweetinvi), I set to wrap the simple instruction sets so that it can work seamlessly with Dynamo.

00. Getting Started:

If you would like to try this on your own, you will need to import the Dynamo Twitter Connector. Unfortunately, I don't have this as a published package, but you are welcome to download the build the connector from GitHub source. Alternatively, you can simply download the Binaries (Debug) folder. Then you can 'Import Library' from the Dynamo 'File' menu to have the Connector show up in the tool palette.


01. Authentication: 

In order to connect to Twitter, Twitter needs to know who we are. Basically this involve creating an 'App' via your twitter account. You can do so by going to https://apps.twitter.com/ and signing in.
After, we can create four keys: the consumer key, consumer secret, access token, and access token secret.

02. Retrieving Time Lines:

Once you are authenticated, the rest is relatively simple from a coding perspective. All that is left to do is to hook-up your Dynamo Nodes to retrieve and convert tweets in your time line to a string.


03a. Displaying Time Lines:

This step involves setting up a 'Text' parameter in a Generic Annotation Family and hooking it up to the output of the previous step. Strangely, I'm finding that it is not easy to select annotation families in Dynamo. I had to jump through a couple of hoops - but it was the least of my problems.

03b. Tweeting from Revit:

Tweeting from your Project is a breeze with the 'Publish Tweet' node.


Friday, July 31, 2015

Deleting Revit Backup Files Recursively using VB Script

Revit Back-up files are useful. However, it can be quite annoying when they fill up a folder and one accidentally starts working off of a back up rather than the latest file.

As a quick fix, I cobbled together a vbs script (learning a bit of vbs in the process) that would delete .rvt and .rfa back files (anything with the pattern <filename>.<####>.rvt or rfa.

Thursday, April 23, 2015

Geodesic Sphere - Bucky Ball Try out


A few years back, a client had asked if there was a way to build a Geodesic Dome in Revit. I tried, and tried... but got nowhere in the limited time I had. The only solution I could recommend was to use a script to generate points that could then be connected by adaptive components.
Then yesterday, when looking for something else (as is wont to happen more often than I care to admit), I found a tutorial by Tom Vollaro that broke down the problem in terms of simple geometry. I not only learnt how to build a geodesic sphere, but finally understood the underlying geometric basis for the form.

Of course, not all of us have the time to build it ourselves - So, I'm sharing :-). (You can download it from my drive here)

Wednesday, April 22, 2015

Revit Adaptive Components: Practical Archetypes: The Vaulted Ceiling – Part Two

Vaulted Ceiling Adaptive Component
Typical Manual Process of Placing The Adaptive Component

The next part of this two-part series focuses on the actual placement of the adaptive component (Part One can be found here: http://parametrix.blogspot.com/2013/01/revit-adaptive-components-practical.html. This part might tend to get boring since it entails the endless picking of Grid Intersections for all the bays of the building. Fortunately, this does not have to be the case: anytime you see a repetitive task, think of the purpose for inventing machines - the computer in this case. The only variables in this case are the eight Adaptive Points and they can be abstracted away in terms of their x & y coordinates ( the z coordinate is not being considered since it is being controlled by the internal instance parameters of the Adaptive Component). Once this information is read by a python code, it is just a matter of telling the python code to place the Adaptive Points at those coordinates.

Tuesday, April 21, 2015

Curved Curtain Wall Panels in Revit


Curved curtain walls are one of those things that pop up occasionally in an architectural project. If you are willing to live with a modified basic wall, HyunWoo Kim has a wonderful solution using wall sweeps. I had built a custom curved curtain panel family for a client a couple of years back and I recall the effort being a confusing mess of trigonometric functions. So when another client asked for pointers on building a curved curtain panel family, I decided to revisit the family and see if I could re-create the one I had built earlier (in Revit 2013). What I ended up with was a pleasantly clarified version without any of the trigonometric functions to muddy the waters.

Monday, March 25, 2013

Revit Adaptive Component: Practical Archetypes - Curved Glass CurtainWalls

[caption id="attachment_455" align="aligncenter" width="480"]Panelization of the Curved Surface using Adaptive Component Families Panelization of the Curved Surface using Adaptive Component Families[/caption]

Curved panels are particularly gnarly! Curved and Non-rectilinear are more so. This is one of those situations where you don't have a choice but to use Adaptive Components.

In this post I'm going to attempt to show how simple the building of a curved and trapezoidal panel can be. So, bring out the rusty trigonometry toolbox (or googling skills) and let's get started!

Monday, January 7, 2013

Revit Adaptive Components: Practical Archetypes: The Vaulted Ceiling -Part One

By Ophelia2 (Own work) [GFDL (http://www.gnu.org/copyleft/fdl.html) or CC-BY-SA-3.0-2.5-2.0-1.0 (http://creativecommons.org/licenses/by-sa/3.0)], via Wikimedia Commons
Ophelia2 (Own work) [GFDL (http://www.gnu.org/copyleft/fdl.html) or CC-BY-SA-3.0-2.5-2.0-1.0 (http://creativecommons.org/licenses/by-sa/3.0)], via Wikimedia Commons[/caption]

If you had anything to do with buildings in New York, chances are that you may have encountered elaborate, arched or vaulted ceilings. Even if you weren't designing the space 'in-the-manner-of' the gilded age, more often than not, you would have documented what exists and surgically excised or implanted your work into the existing fabric. This is when you realize that these marvels of geometric complexity aren't that perfect. A fairly accurate survey of all the crowns and spring-points of the arches will tell you that all of them are off by a few inches from the ideal geometrical vision of Architecture. Unfortunately, it is a few inches that usually stands in the way of possible and impossible within which most designers have to work with. So, the challenge here is: how do you build a ceiling using Revit that sufficiently accurately mimics the geometrical anomalies of the real world? The answer surprisingly is not that simple...

Tuesday, August 28, 2012

Having Fun with Autodesk Sketchbook Designer for the I-Pad

Sketchbook Designer 2013 from Francis on Vimeo.


Sketchbook Designer 2013 from parametric analytics on Vimeo.

Move over paper napkin! The I-pad (or android device) is here!*

This video is a little test run to see if my rusty sketching skills** would get any better on an I-pad. (Sadly, it does not). But sloppy sketching aside, the Autodesk Sketchbook Designer App has all the tools you need to record ideas (architectural or otherwise) on the fly. I find another app 'Paper' to be a better suit for journal type recording in terms of its interface, but the sheer range of drawing options along with a 'correction' option for those shaky hands make this a handy tool to have at your disposal.

*poor quality pun intended (with due apologies)
**No, I don't sketch that fast - I sped up the video 3x